Garbage Disposal Jammed: Easy Steps for Repair
A malfunctioning garbage disposal can disrupt kitchen functionality, and a jammed unit is a common issue homeowners encounter. Understanding when to seek professional help is crucial for efficient and safe resolution. In this guide, we'll explore signs indicating that your jammed garbage disposal requires the expertise of a professional technician. From persistent jams and unusual noises to leakage problems and age-related wear, recognizing these cues will empower you to make informed decisions. Professional intervention ensures a comprehensive inspection, addressing underlying issues and safeguarding your disposal unit's performance. Let's delve into the key indicators that it's time to call in a pro for your jammed garbage disposal.
Diagnosing the Jam: Identifying the Culprit in Your Garbage Disposal
Encountering a jammed garbage disposal can be a frustrating kitchen dilemma, disrupting the seamless flow of daily tasks. To resolve this issue efficiently, the first crucial step is a meticulous diagnostic process to pinpoint the root cause of the jam. Begin by turning off the disposal and carefully inspecting for foreign objects such as utensils, bones, or fibrous materials. Utilize a flashlight to enhance visibility and ensure a thorough examination.
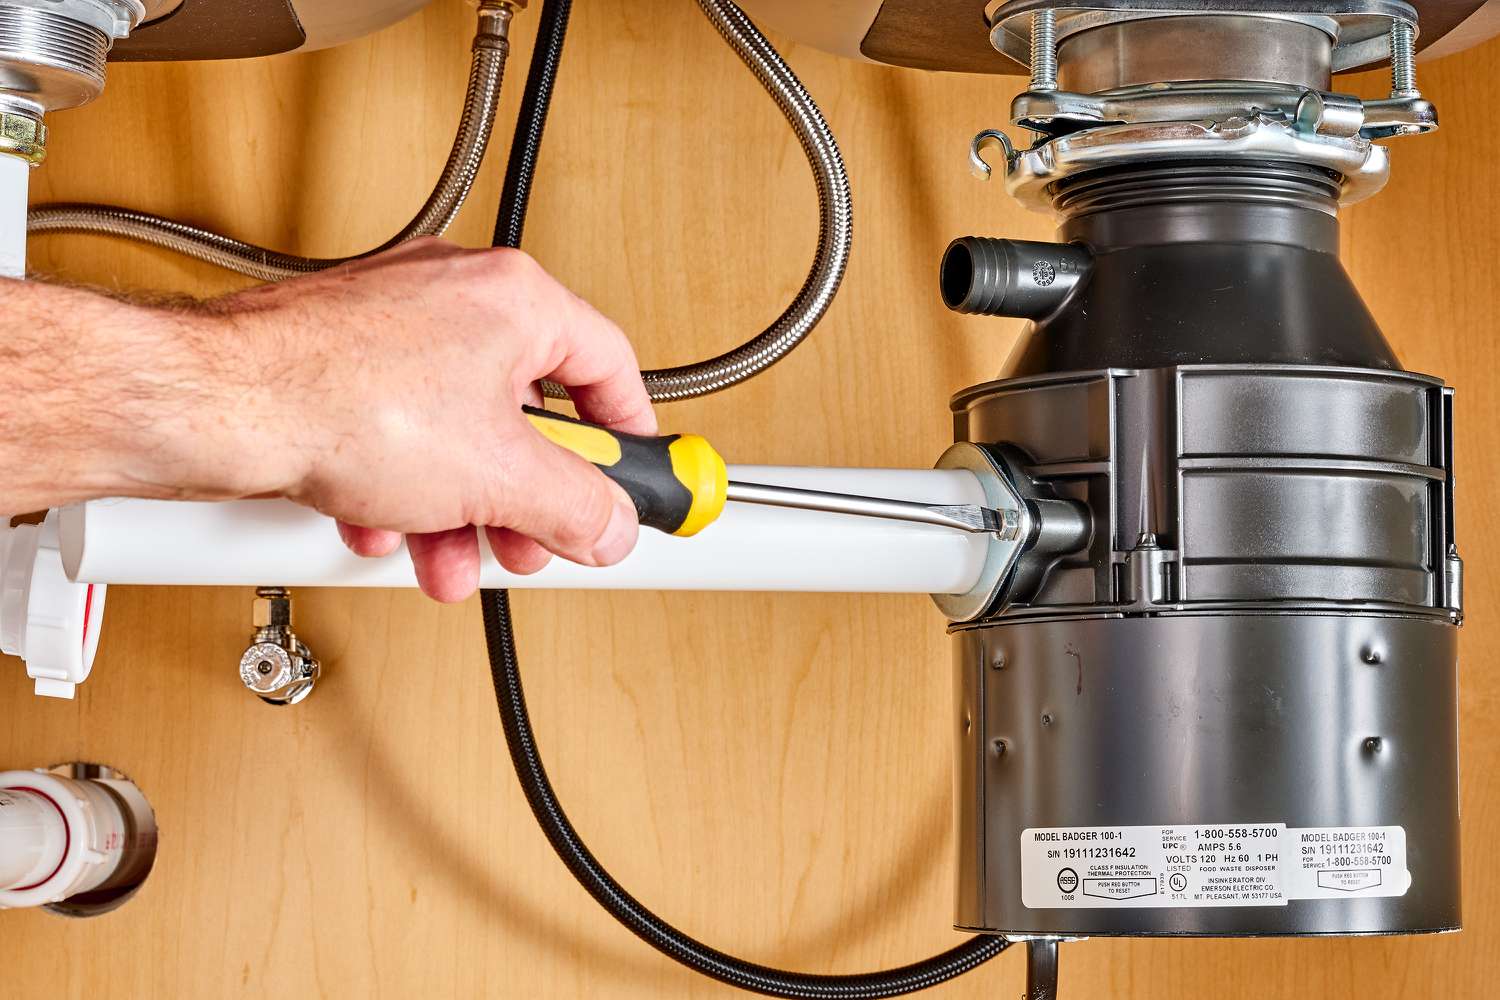
If visible blockages are absent, move on to the Allen wrench method. Underneath the disposal unit, locate the hexagonal-shaped hole and insert an Allen wrench. Rotate the wrench back and forth to manually dislodge any internal obstructions. Additionally, check for a reset button on the disposal unit and press it to reset the motor.
Understanding the intricacies of your garbage disposal and identifying the specific cause of the jam empowers you to proceed with targeted troubleshooting. By following these diagnostic steps, you pave the way for effective repairs, ensuring a smoothly functioning disposal system and a hassle-free kitchen experience.
DIY Troubleshooting Techniques: Step-by-Step Guide to Unjamming Your Disposal
Encountering a jammed garbage disposal is a common kitchen inconvenience, but with a DIY troubleshooting guide, you can navigate through the process with ease. Follow these step-by-step instructions to unjam your disposal and restore its optimal performance.
Safety First
Before diving into the troubleshooting process, ensure your safety. Turn off the disposal and disconnect it from the power source to prevent accidental activation during the repair.
Identify the Source
Inspect the disposal chamber visually to identify any visible obstructions. Use a flashlight to enhance visibility. Remove any foreign objects such as utensils, bones, or fibrous materials causing the jam.
Utilize the Allen Wrench
Locate the hexagonal-shaped hole underneath the disposal unit. Insert an Allen wrench into the hole and rotate it back and forth. This manual rotation helps dislodge any internal obstructions causing the jam.
Reset the Motor
Check for a reset button on the disposal unit. Press the reset button to reset the motor. This simple step often resolves jams caused by motor overload.
Turn on the Disposal
After completing the above steps, restore power to the disposal and turn it on. Run cold water while operating the disposal to flush out any remaining debris and ensure smooth functionality.
Test the Disposal
Test the disposal by running it with a small amount of food waste. Monitor its performance to ensure the jam has been successfully resolved.
By following this DIY troubleshooting guide, you can effectively address a jammed garbage disposal without the need for professional assistance. Remember to exercise caution throughout the process and prioritize safety for a hassle-free repair experience.
The Role of the Reset Button: How to Safely Reset a Jammed Garbage Disposal
The reset button on a garbage disposal plays a pivotal role in resolving jams and restoring optimal functionality. When faced with a jammed disposal, understanding how to safely utilize the reset button is key to a successful DIY repair.
Identify the Reset Button
Locate the reset button on the bottom or side of the disposal unit. It is typically a small, red button positioned near the motor.
Turn Off the Disposal
Before pressing the reset button, ensure the disposal is turned off and disconnected from the power source. This step is crucial for your safety during the reset process.
Inspect for Obstructions
Prior to resetting, visually inspect the disposal chamber for any visible obstructions. Remove any foreign objects, ensuring the reset addresses the underlying issue.
Press the Reset Button
Press the reset button firmly. This action resets the disposal's internal circuitry and motor, addressing issues like motor overload or minor jams.
Wait for a Click
While pressing the reset button, you may feel a slight resistance. Continue pressing until you hear a distinct click sound. This indicates that the reset process is complete.
Restore Power
After successfully resetting the disposal, reconnect it to the power source. Before turning it on, run cold water to help clear any remaining debris.
Test the Disposal
Turn on the disposal and run it with a small amount of food waste. Monitor its operation to ensure the reset has effectively resolved the jam, and the disposal is working smoothly.
The reset button serves as a valuable tool in troubleshooting and resolving jams, providing a straightforward solution for common disposal issues. By following these steps, you can safely and effectively reset your garbage disposal, avoiding the need for professional assistance.
Using the Allen Wrench Method: A Handy Tool for Disposal Repair
Utilizing an Allen wrench is a practical and efficient method for resolving jams in your garbage disposal. This handy tool allows you to manually rotate the disposal's impellers, dislodging any obstructions causing the jam. Follow these steps for a successful DIY repair:
Turn Off the Disposal
Before starting the Allen wrench method, ensure the disposal is turned off and unplugged. This precautionary step ensures your safety during the repair process.
Locate the Hexagonal Hole
Look for the hexagonal hole at the bottom of the disposal unit. This is where you'll insert the Allen wrench to manually rotate the impellers.
Insert the Allen Wrench
Insert the Allen wrench into the hexagonal hole and engage it with the impellers. You may need to apply a bit of force to break through any initial resistance.
Rotate Clockwise and Counter-Clockwise
Once the Allen wrench is engaged, rotate it clockwise and then counter-clockwise. This motion helps dislodge any jammed material and allows the impellers to move freely.
Remove Obstructions
While rotating the wrench, be attentive to any resistance or unusual sounds. If you encounter resistance, it may indicate the presence of a stubborn obstruction. Try to rotate the impellers until the resistance lessens or is eliminated.
Turn On the Disposal
After manually addressing the jam with the Allen wrench, reconnect the disposal to the power source. Run cold water and turn on the disposal to test its operation. Ensure that the impellers are now moving freely.
Dispose of Small Food Residue
To prevent future jams, dispose of small food residues gradually rather than in large amounts. Running cold water while the disposal is in use helps clear away debris.
By using the Allen wrench method, you can effectively troubleshoot and repair a jammed garbage disposal without the need for professional assistance. This DIY approach saves both time and money while restoring your disposal's optimal functionality.
Preventing Future Jams: Best Practices for Garbage Disposal Maintenance
Preventing future jams in your garbage disposal involves adopting best practices for regular maintenance. Follow these essential tips to ensure the optimal performance and longevity of your disposal unit:
Run Cold Water During Use
Always run cold water when operating the garbage disposal. Cold water helps solidify grease and oils, preventing them from accumulating and causing clogs. Additionally, it aids in flushing away food particles.
Use the Disposal Regularly
Frequent use of the garbage disposal helps prevent rust and corrosion. Running it regularly ensures that moving parts stay lubricated and prevents the buildup of debris. If left unused for extended periods, the disposal may become more prone to jams.
Cut Large Items into Smaller Pieces
To avoid overwhelming the disposal, cut large food items into smaller pieces before putting them down the drain. This practice reduces the likelihood of jams caused by oversized or hard-to-process materials.
Avoid Fibrous and Starchy Foods
Fibrous and starchy foods, such as celery, potato peels, and pasta, can create a gummy consistency that leads to clogs. Refrain from putting these items into the disposal to minimize the risk of jams.
Use Citrus Peels for Freshness
Tossing citrus peels down the disposal not only adds a fresh scent but also helps clean the blades and eliminate odors. The natural acidity of citrus fruits can assist in breaking down grease and residue.
Avoid Non-Food Items
Keep non-food items, such as plastic, metal, or glass, away from the disposal. These items can damage the blades, cause jams, or result in more severe issues.
Grind Ice Cubes
Periodically grinding ice cubes in the disposal helps sharpen the blades and dislodge any debris or buildup. This simple maintenance task contributes to the overall efficiency of the unit.
Check for Leaks and Unusual Noises
Regularly inspect your garbage disposal for leaks or unusual noises. Identifying and addressing issues promptly can prevent more significant problems and extend the life of the unit.
Know When to Seek Professional Help
If you encounter persistent issues despite regular maintenance, it's advisable to consult a professional plumber or appliance repair technician. They can identify underlying problems and perform necessary repairs or replacements.
By incorporating these best practices into your garbage disposal maintenance routine, you can significantly reduce the risk of jams and ensure smooth and trouble-free operation. Regular care and attention contribute to a more reliable and efficient disposal system in your kitchen.
When to Call a Pro: Signs Your Jammed Garbage Disposal Requires Professional Attention
Recognizing the signs that your jammed garbage disposal demands professional intervention is crucial for maintaining a functional kitchen. Here are indications that it's time to call in a pro:
Persistent Jams
If you've attempted DIY troubleshooting without success and your garbage disposal continues to jam regularly, it may signify an underlying issue that requires professional assessment. Repeated jams may indicate problems with the motor, blades, or other components.
Unusual Noises
Unusual or grinding noises during disposal operation could be indicative of damaged or misaligned components. A professional can inspect the unit, identify the source of the noise, and recommend the necessary repairs.
Frequent Resets
If you find yourself frequently resetting the garbage disposal by using the reset button, it's a sign of an underlying problem. Continuous reliance on resets without resolving the root cause can lead to more extensive damage.
Leakage Issues
Leaks around the garbage disposal are a clear sign that something is amiss. Professional plumbers can identify the source of the leak, whether it's a faulty seal, a cracked housing, or other issues, and provide effective solutions.
Slow Draining
A slow-draining garbage disposal may indicate a blockage or insufficient grinding power. Professionals have the expertise to diagnose and address issues affecting the disposal's drainage capabilities.
Burning Smells
Persistent burning smells emanating from the garbage disposal suggest potential motor issues or electrical problems. It's essential to address such odors promptly to prevent further damage.
Lack of Power
If your garbage disposal isn't turning on at all, it could be a sign of electrical or motor failure. Professional technicians can assess the electrical connections and motor functionality to pinpoint and resolve the issue.
Age and Wear
Older garbage disposals may experience wear and tear, diminishing their efficiency. If your disposal is aging and exhibiting signs of declining performance, consulting a professional can help determine if it's time for a replacement.
Previous DIY Attempts Failed
If your initial DIY attempts to unjam the disposal were unsuccessful, it's advisable to seek professional assistance. Continuing to force the disposal or using excessive DIY methods may lead to more significant problems.
Safety Concerns
If you're uncertain about the safety of handling your garbage disposal or if you experience electrical issues, it's best to prioritize safety and consult a professional technician.
Calling a professional for a jammed garbage disposal ensures a thorough inspection, accurate diagnosis, and appropriate repairs or replacements. It helps maintain the longevity of your disposal unit and prevents potential hazards in your kitchen.
